


Chương 5-Bài 4. Phân tích và tạo bố cục (layout) cho trang web NetaShop
Tác giả: Dương Nguyễn Phú Cường
Số phút học: 32 phút
Số phút học: 32 phút
Ngày đăng:
15/7/2026, 5:6
Lượt xem: 2349
Phân tích Bố cục (layout) cho trang web NetaShop
Chúng ta sẽ tạo bố cục (layout) trang web đơn giản, gồm 2 layout như sau:Layout mặc định (default layout)
Đây là layout sẽ sử dụng cho các trang như Trang chủ, Trang Tin tức, ...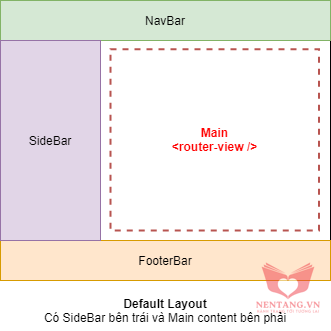 Cấu trúc sẽ bao gồm:
- Thanh
NavBar: đây là thanh điều hướng (menu) nằm trên cùng của trang web - Phần
SideBar: đây là phần nằm bên trái của trang web, sẽ được thiết kế theo cột 3 (Bootstrap). Thường sẽ chứa các thông tin về Chuyên mục Sản phẩm, banner quảng cáo, ... - Phần
Main: đây là thành phần chính của trang web, chứa placeholder<router-view />dùng để thay đổi nội dung khi người dùng điều hướng qua trang khác. - Phần
FooterBar: đây là chân trang web. Thường để chứa các thông tin Địa chỉ, Số điện thoại, Email, ... để khách hàng liên hệ.
Thiết kế DefaultLayout trong VueJS
Step 1: tạo component Thanh điều hướng NavBar
- Tạo file
project-netashop/src/components/NavBar.vue - Nội dung file như sau:
<template>
<nav class="navbar navbar-expand-lg navbar-dark bg-dark sticky-top">
<div class="container">
<router-link to="/" class="navbar-brand">NetaShop</router-link>
<button
class="navbar-toggler"
type="button"
data-toggle="collapse"
data-target="#navbarSupportedContent"
aria-controls="navbarSupportedContent"
aria-expanded="false"
aria-label="Toggle navigation"
>
<span class="navbar-toggler-icon"></span>
</button>
<div class="collapse navbar-collapse" id="navbarSupportedContent">
<ul class="navbar-nav mr-auto">
<li>
<router-link to="/" class="nav-link" exact-active-class="text-success" active-class="active">
<font-awesome-icon :icon="['fas', 'home']" /> Trang chủ
</router-link>
</li>
<li>
<router-link to="/gioi-thieu" class="nav-link" exact-active-class="text-success" active-class="active">
<font-awesome-icon :icon="['fab', 'twitter']" /> Giới thiệu
</router-link>
</li>
<li>
<router-link to="/lien-he" class="nav-link" exact-active-class="text-success" active-class="active">
<font-awesome-icon :icon="['fab', 'twitter']" /> Liên hệ
</router-link>
</li>
</ul>
</div>
</div>
</nav>
</template>
<script>
export default {
}
</script>
<style></style>
Step 2: tạo component Thanh điều hướng SideBar
- Tạo file
project-netashop/src/components/SideBar.vue - Nội dung file như sau:
<template>
  <div class="sidebar">
    <a href="#">
      <img src="@/assets/img/logo-nentang.jpg" class="img-fluid img-thumbnail" />
    </a>
    <h1>Neta Shop</h1>
    <ul class="list-group my-2">
      <li class="list-group-item active">
        <a href="#" class="text-white">Máy tính xách tay</a>
      </li>
      <li class="list-group-item">
        <a href="#">Điện thoại</a>
      </li>
      <li class="list-group-item">
        <a href="#">Phụ kiện, linh kiện máy tính</a>
      </li>
    </ul>

    <a href="#">
      <img src="@/assets/img/banner/banner-1.png" class="img-fluid img-thumbnail my-2" />
    </a>

    <a href="#">
      <img src="@/assets/img/banner/banner-2.png" class="img-fluid img-thumbnail my-2" />
    </a>
  </div>
</template>

<script>
export default {
}
</script>

<style></style>
Step 3: tạo component Thanh điều hướng FooterBar
- Tạo file
project-netashop/src/components/FooterBar.vue - Nội dung file như sau:
<template>
  <footer class="footer border-top">
    <div class="container">
      <div class="content has-text-centered">
        <p>
          Made with ? by <a href="https://nentang.vn">NenTang.vn | Nền tảng tới Tương lai</a>
        </p>
      </div>
    </div>
  </footer>
</template>

<script>
export default {
}
</script>

<style></style>
Step 4: tạo bố cục mặc định DefaultLayout
- Để dễ dàng quản lý bố cục trang web, chúng ta sẽ tạo thư mục
project-netashop/src/layouts/. Tất cả layout của trang web sẽ được nằm trong đây. - Tạo file
project-netashop/src/layouts/DefaultLayout.vue - Nội dung file như sau:
<template>
  <div class="LayoutDefault">
    <nav-bar />

    <div class="container mt-2">
      <div class="row">
        <div class="col-md-3">
          <side-bar />
        </div>
        <div class="col-md-9">
          <main class="LayoutDefault__main">
            <slot />
          </main>
        </div>
      </div>
    </div>

    <footer-bar />
  </div>
</template>

<script>
// Import thành phần (components) NavBar, SideBar, FooterBar để sử dụng
import NavBar from '@/components/NavBar'
import SideBar from '@/components/SideBar'
import FooterBar from '@/components/FooterBar'

// Để sử dụng được các thẻ (tag) của các component tương ứng
// <nav-bar />     -> component NavBar
// <side-bar />    -> component SideBar
// <footer-bar />  -> component FooterBar
// Chúng ta phải khai báo trong thuộc tính `components` của phần export default {}
export default {
  components: {
    NavBar,
    SideBar,
    FooterBar
  }
}
</script>

<style scoped>

</style>
Step 5: tạo component Trang chủ Home.vue
- Để dễ dàng quản lý các trang web, chúng ta sẽ tạo thư mục
project-netashop/src/pages/. Tất cả các trang web sẽ được nằm trong đây. - Tạo file
project-netashop/src/pages/Home.vue - Nội dung file như sau:
<template>
  <div id="home-page">
    Trang chủ
  </div>
</template>

<script>
export default {
}
</script>

<style>

</style>
Step 6: tạo route Trang chủ /
- Hiệu chỉnh file
project-netashop/src/router/index.js - Nội dung file như sau:
import Vue from 'vue'
import Router from 'vue-router'

Vue.use(Router)

/* Chúng ta sử dụng thuộc tính `meta` trong routes để khai báo:
- Ứng với path /                  -> sẽ sử dụng layout `default`
- Ứng với path /gioi-thieu        -> sẽ sử dụng layout `no-sidebar`
- Ứng với path /lien-he           -> sẽ sử dụng layout `no-sidebar`
- Ứng với path /kiem-tra-gio-hang -> sẽ sử dụng layout `no-sidebar`
- Ứng với path không tìm thấy 404 -> sẽ sử dụng layout `no-sidebar`
*/
const routes = [
  {
    path: '/',
    name: 'home',
    meta: {
      layout: 'default'
    },
    // component: require('@/pages/Home.vue').default
    component: () => import('@/pages/Home.vue')
  },
]

// Để đường dẫn Path đẹp hơn và thân thiện với người dùng và SEO
// Chúng ta sử dụng History mode thay vì HashTag mode (dấu #)
const router = new Router({
  mode: 'history',
  routes: routes
})

export default router
Step 7: đăng ký component DefaultLayout
- Hiệu chỉnh file
project-netashop/src/main.js - Nội dung file như sau:
// The Vue build version to load with the `import` command
// (runtime-only or standalone) has been set in webpack.base.conf with an alias.
import Vue from 'vue'
import App from './App'
import router from './router'

Vue.config.productionTip = false

// Import thư viện Bootstrap (JS và CSS)
import 'bootstrap'
import 'bootstrap/dist/css/bootstrap.min.css'

// Import thư viện Font Awesome
import { library } from '@fortawesome/fontawesome-svg-core'
import { fab } from '@fortawesome/free-brands-svg-icons'
import { fas } from '@fortawesome/free-solid-svg-icons'
import { far } from '@fortawesome/free-regular-svg-icons'
import { FontAwesomeIcon } from '@fortawesome/vue-fontawesome'

// Đăng ký component Global Layouts
import Default from './layouts/LayoutDefault.vue'

library.add(fab, fas, far)
Vue.component('font-awesome-icon', FontAwesomeIcon)
Vue.component('default-layout', Default)


/* eslint-disable no-new */
new Vue({
  el: '#app',
  router,
  components: { App },
  template: '<App/>'
})
Step 8: yêu cầu VueJs render component tương ứng
- Hiệu chỉnh file
project-netashop/src/App.vue - Nội dung file như sau:
<template>
  <div id="app" class="App">
    <!-- Sử dụng <component> :is để kiểm tra và yêu cầu VueJS:
      - Tương ứng với Component nào thì sẽ hiển thị layout tương ứng
    -->
    <component :is="layout">
      <router-view />
    </component>
  </div>
</template>

<script>
// Khai báo layout mặc định là default
const defaultLayout = 'default'

export default {
  computed: {
    layout () {
      // Sử dụng this.$route.meta.layout để kiểm tra xem trong route có khai báo meta tương ứng hay không?
      // Nếu không có khai báo layout -> sẽ hiển thị layout default
      return (this.$route.meta.layout || defaultLayout) + '-layout'
    }
  },
  created () {
    // nothing defined here (when this.$route.path is other than "/")
    console.log(this.$route, this.$route.meta.layout)
  },
  updated () {
    // something defined here whatever the this.$route.path
    console.log(this.$route, this.$route.meta.layout)
  }
}
</script>

<style>
</style>
Layout không có sidebar (nosidebar layout)
Đây là layout sẽ sử dụng cho các trang như Trang Giới thiệu, Trang Liên hệ, ...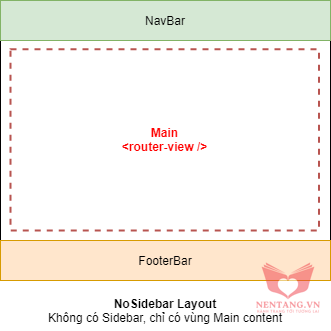 Cấu trúc sẽ bao gồm:
- Thanh
NavBar: đây là thanh điều hướng (menu) nằm trên cùng của trang web - Phần
Main: đây là thành phần chính của trang web, chứa placeholder<router-view />dùng để thay đổi nội dung khi người dùng điều hướng qua trang khác. - Phần
FooterBar: đây là chân trang web. Thường để chứa các thông tin Địa chỉ, Số điện thoại, Email, ... để khách hàng liên hệ.
Thiết kế NoSidebarLayout trong VueJS
Step 1: tạo bố cục mặc định NoSidebarLayout
- Để dễ dàng quản lý bố cục trang web, chúng ta sẽ tạo thư mục
project-netashop/src/layouts/. Tất cả layout của trang web sẽ được nằm trong đây. - Tạo file
project-netashop/src/layouts/NoSidebarLayout.vue - Nội dung file như sau:
<template>
  <div class="LayoutNoSidebar">
    <nav-bar />

    <div class="container">
      <main class="LayoutNoSidebar__main mt-2">
        <slot />
      </main>
    </div>

    <footer-bar />
  </div>
</template>

<script>
// Import thành phần (components) NavBar, FooterBar để sử dụng
import NavBar from '@/components/NavBar'
import FooterBar from '@/components/FooterBar'

// Để sử dụng được các thẻ (tag) của các component tương ứng
// <nav-bar />     -> component NavBar
// <footer-bar />  -> component FooterBar
// Chúng ta phải khai báo trong thuộc tính `components` của phần export default {}
export default {
  components: {
    NavBar,
    FooterBar
  }
}
</script>

<style></style>
Step 2: tạo component Trang Giới thiệu About.vue
- Để dễ dàng quản lý các trang web, chúng ta sẽ tạo thư mục
project-netashop/src/pages/. Tất cả các trang web sẽ được nằm trong đây. - Tạo file
project-netashop/src/pages/About.vue - Nội dung file như sau:
<template>
  <section>
    <div class="container">
      <h1>Giới thiệu NetaShop</h1>
    </div>
  </section>
</template>
Step 3: tạo route Trang Giới thiệu /gioi-thieu
- Hiệu chỉnh file
project-netashop/src/router/index.js - Nội dung file như sau:
import Vue from 'vue'
import Router from 'vue-router'

Vue.use(Router)

/* Chúng ta sử dụng thuộc tính `meta` trong routes để khai báo:
- Ứng với path /                  -> sẽ sử dụng layout `default`
- Ứng với path /gioi-thieu        -> sẽ sử dụng layout `no-sidebar`
- Ứng với path /lien-he           -> sẽ sử dụng layout `no-sidebar`
- Ứng với path /kiem-tra-gio-hang -> sẽ sử dụng layout `no-sidebar`
- Ứng với path không tìm thấy 404 -> sẽ sử dụng layout `no-sidebar`
*/
const routes = [
  {
    path: '/',
    name: 'home',
    meta: {
      layout: 'default'
    },
    // component: require('@/pages/Home.vue').default
    component: () => import('@/pages/Home.vue')
  },
  {
    path: '/gioi-thieu',
    name: 'about',
    meta: {
      layout: 'no-sidebar'
    },
    component: () => import('@/pages/About.vue')
  }
]

// Để đường dẫn Path đẹp hơn và thân thiện với người dùng và SEO
// Chúng ta sử dụng History mode thay vì HashTag mode (dấu #)
const router = new Router({
  mode: 'history',
  routes: routes
})

export default router
Step 4: tạo component Trang Liên hệ Contact.vue
- Để dễ dàng quản lý các trang web, chúng ta sẽ tạo thư mục
project-netashop/src/pages/. Tất cả các trang web sẽ được nằm trong đây. - Tạo file
project-netashop/src/pages/Contact.vue - Nội dung file như sau:
<template>
  <section>
    <div class="container">
      <h1>Thông tin Liên hệ</h1>
    </div>
  </section>
</template>
Step 3: tạo route Trang Liên hệ /lien-he
- Hiệu chỉnh file
project-netashop/src/router/index.js - Nội dung file như sau:
import Vue from 'vue'
import Router from 'vue-router'

Vue.use(Router)

/* Chúng ta sử dụng thuộc tính `meta` trong routes để khai báo:
- Ứng với path /                  -> sẽ sử dụng layout `default`
- Ứng với path /gioi-thieu        -> sẽ sử dụng layout `no-sidebar`
- Ứng với path /lien-he           -> sẽ sử dụng layout `no-sidebar`
- Ứng với path /kiem-tra-gio-hang -> sẽ sử dụng layout `no-sidebar`
- Ứng với path không tìm thấy 404 -> sẽ sử dụng layout `no-sidebar`
*/
const routes = [
  {
    path: '/',
    name: 'home',
    meta: {
      layout: 'default'
    },
    // component: require('@/pages/Home.vue').default
    component: () => import('@/pages/Home.vue')
  },
  {
    path: '/gioi-thieu',
    name: 'about',
    meta: {
      layout: 'no-sidebar'
    },
    component: () => import('@/pages/About.vue')
  },
  {
    path: '/lien-he',
    name: 'contact',
    meta: {
      layout: 'no-sidebar'
    },
    component: () => import('@/pages/Contact.vue')
  }
]

// Để đường dẫn Path đẹp hơn và thân thiện với người dùng và SEO
// Chúng ta sử dụng History mode thay vì HashTag mode (dấu #)
const router = new Router({
  mode: 'history',
  routes: routes
})

export default router
Step 5: tạo component Trang 404 404.vue
- Để dễ dàng quản lý các trang web, chúng ta sẽ tạo thư mục
project-netashop/src/pages/. Tất cả các trang web sẽ được nằm trong đây. - Tạo file
project-netashop/src/pages/404.vue - Nội dung file như sau:
<template>
  <div class="section">
    <h1>Xin lỗi, Trang không tìm thấy (404) !!!</h1>
  </div>
</template>
Step 6: tạo route Trang 404 *
- Hiệu chỉnh file
project-netashop/src/router/index.js - Nội dung file như sau:
import Vue from 'vue'
import Router from 'vue-router'

Vue.use(Router)

/* Chúng ta sử dụng thuộc tính `meta` trong routes để khai báo:
- Ứng với path /                  -> sẽ sử dụng layout `default`
- Ứng với path /gioi-thieu        -> sẽ sử dụng layout `no-sidebar`
- Ứng với path /lien-he           -> sẽ sử dụng layout `no-sidebar`
- Ứng với path /kiem-tra-gio-hang -> sẽ sử dụng layout `no-sidebar`
- Ứng với path không tìm thấy 404 -> sẽ sử dụng layout `no-sidebar`
*/
const routes = [
  {
    path: '/',
    name: 'home',
    meta: {
      layout: 'default'
    },
    // component: require('@/pages/Home.vue').default
    component: () => import('@/pages/Home.vue')
  },
  {
    path: '/gioi-thieu',
    name: 'about',
    meta: {
      layout: 'no-sidebar'
    },
    component: () => import('@/pages/About.vue')
  },
  {
    path: '/lien-he',
    name: 'contact',
    meta: {
      layout: 'no-sidebar'
    },
    component: () => import('@/pages/Contact.vue')
  },
  {
    path: '*',
    name: '404',
    meta: {
      layout: 'no-sidebar'
    },
    component: () => import('@/pages/404.vue')
  }
]

// Để đường dẫn Path đẹp hơn và thân thiện với người dùng và SEO
// Chúng ta sử dụng History mode thay vì HashTag mode (dấu #)
const router = new Router({
  mode: 'history',
  routes: routes
})

export default router
Step 7: đăng ký component NoSidebarLayout
- Hiệu chỉnh file
project-netashop/src/main.js - Nội dung file như sau:
// The Vue build version to load with the `import` command
// (runtime-only or standalone) has been set in webpack.base.conf with an alias.
import Vue from 'vue'
import App from './App'
import router from './router'

Vue.config.productionTip = false

// Import thư viện Bootstrap (JS và CSS)
import 'bootstrap'
import 'bootstrap/dist/css/bootstrap.min.css'

// Import thư viện Font Awesome
import { library } from '@fortawesome/fontawesome-svg-core'
import { fab } from '@fortawesome/free-brands-svg-icons'
import { fas } from '@fortawesome/free-solid-svg-icons'
import { far } from '@fortawesome/free-regular-svg-icons'
import { FontAwesomeIcon } from '@fortawesome/vue-fontawesome'

// Đăng ký component Global Layouts
import Default from './layouts/LayoutDefault.vue'
import NoSidebar from './layouts/LayoutNoSidebar.vue'

library.add(fab, fas, far)
Vue.component('font-awesome-icon', FontAwesomeIcon)
Vue.component('default-layout', Default)
Vue.component('no-sidebar-layout', NoSidebar)


/* eslint-disable no-new */
new Vue({
  el: '#app',
  router,
  components: { App },
  template: '<App/>'
})
Ủng hộ tác giả

Bình luận
Bình luận của bạnNền tảng các kiến thức học tập
Cùng nhau học tập, khám phá các kiến thức nền tảng về Lập trình web, mobile, database nhé.
Nền tảng kiến thức - Hành trang tới tương lai hân hạnh phục vụ Quý khách!
Khám phá, trải nghiệm ngay
Vui lòng đăng nhập để gởi bình luận!
Đăng nhậpChưa có bình luận nào!