


Chương 11-Bài 5. Tạo giao diện trang Liên hệ (contact)
Tác giả: Dương Nguyễn Phú Cường
Số phút học: 74 phút
Số phút học: 74 phút
Ngày đăng:
5/2/2026, 11:47
Lượt xem: 1353
Thực hiện tạo giao diện trang Liên hệ (contact)
Mô hình hoạt động của action contact():
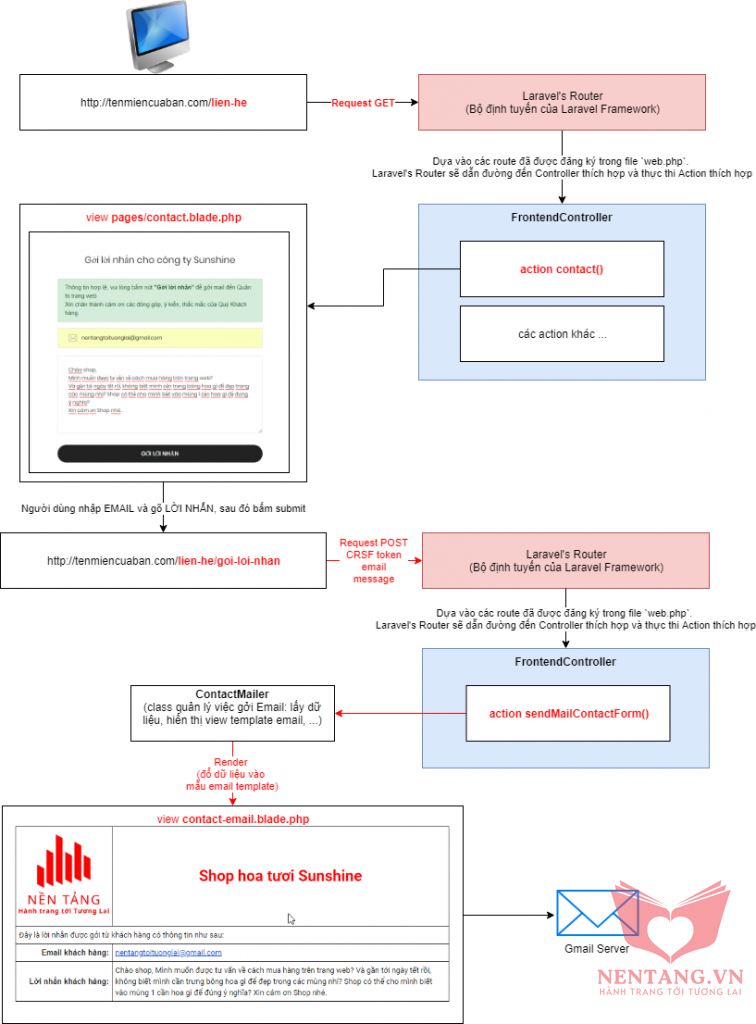
Step 1: tạo route contact
- Hiệu chỉnh file
routes/web.php
Route::get('/lien-he', 'Frontend\FrontendController@contact')->name('frontend.contact');
Step 2: viết code action
Viết code cho action contact():
- Action
contact()dùng để hiển thị giao diện trang Liên hệcontact.
Hiệu chỉnh file app/Http/Controllers/Frontend/FrontendController.php
/** * Action hiển thị view Liên hệ * GET /contact */
public function contact()
{
    return view('frontend.pages.contact');
}
Tạo view contact.blade.php
- Để dễ dàng quản lý các view, ta sẽ tạo 1 thư mục tương ứng với tên Controller, mỗi action sẽ tương ứng với tên view.
- Tạo folder
resources/views/frontend/pages - Tạo file
resources/views/frontend/pages/contact.blade.php
Lấy mã nhúng bản đồ Google Map
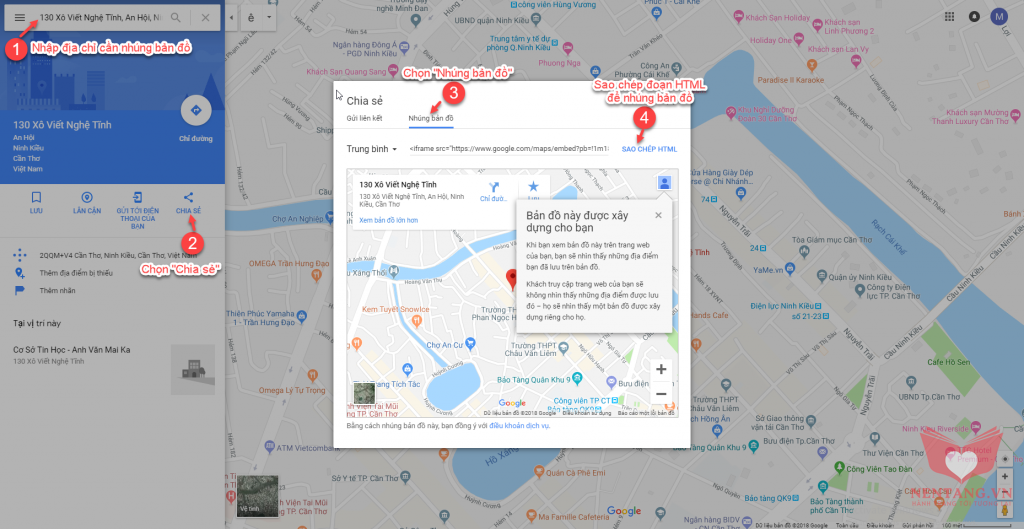
Trong các trang liên hệ, thường sẽ có bản đồ địa điểm công ty. Chúng ta sẽ lấy mã nhúng Google Map như sau:- Truy cập trang web: https://www.google.com/maps
- Lấy mã nhúng như hình:
Nội dung view contact.blade.php
{{-- View này sẽ kế thừa giao diện từ `frontend.layouts.master` --}}
@extends('frontend.layouts.master')

{{-- Thay thế nội dung vào Placeholder `title` của view `frontend.layouts.master` --}}
@section('title')
Liên hệ Shop Hoa tươi - Sunshine
@endsection

{{-- Thay thế nội dung vào Placeholder `custom-css` của view `frontend.layouts.master` --}}
@section('custom-css')
@endsection

{{-- Thay thế nội dung vào Placeholder `main-content` của view `frontend.layouts.master` --}}
@section('main-content')
<!-- Title page -->
<section class="bg-img1 txt-center p-lr-15 p-tb-92" style="background-image: url('{{ asset('themes/cozastore/images/bg-01.jpg') }}');">
    <h2 class="ltext-105 cl0 txt-center">
        Liên hệ
    </h2>
</section>

<!-- Content page -->
<section class="bg0 p-t-104 p-b-116" ng-controller="contactController">
    <div class="container">
        <div class="flex-w flex-tr">
            <div class="size-210 bor10 p-lr-70 p-t-55 p-b-70 p-lr-15-lg w-full-md">
                <form name="contactForm" ng-submit="submitContactForm()" novalidate>
                    <h4 class="mtext-105 cl2 txt-center p-b-30">
                        Gởi lời nhắn cho công ty Sunshine
                    </h4>

                    <!-- Div Thông báo lỗi
            Chỉ hiển thị khi các validate trong form `contactForm` không hợp lệ => contactForm.$invalid = true
            Sử dụng tiền chỉ lệnh ng-show="contactForm.$invalid"
            -->
                    <div class="alert alert-danger" ng-show="contactForm.$invalid">
                        <ul>
                            <!-- Thông báo lỗi email -->
                            <li><span class="error" ng-show="contactForm.email.$error.required">Vui lòng nhập email</span></li>
                            <li><span class="error" ng-show="!contactForm.email.$error.required && contactForm.email.$error.pattern">Chỉ chấp nhập GMAIL, vui lòng kiểm tra lại</span></li>

                            <!-- Thông báo lỗi message -->
                            <li><span class="error" ng-show="contactForm.message.$error.required">Vui lòng nhập lời nhắn</span></li>
                            <li><span class="error" ng-show="contactForm.message.$error.minlength">Lời nhắn phải > 6 ký tự</span></li>
                            <li><span class="error" ng-show="contactForm.message.$error.maxlength">Lời nhắn phải <= 250 ký tự</span> </li> </li> </div> <!-- Div Thông báo validate hợp lệ Chỉ hiển thị khi các validate trong form `contactForm` không hợp lệ=> contactForm.$valid = true
                                        Sử dụng tiền chỉ lệnh ng-show="contactForm.$valid"
                                        -->
                                        <div class="alert alert-success" ng-show="contactForm.$valid">
                                            Thông tin hợp lệ, vui lòng bấm nút <b>"Gởi lời nhắn"</b> để gởi mail đến Quản trị trang web<br />
                                            Xin chân thành cám ơn các đóng góp, ý kiến, thắc mắc của Quý Khách hàng.
                                        </div>

                                        <!-- Validate email -->
                                        <div class="bor8 m-b-20 how-pos4-parent">
                                            <input class="stext-111 cl2 plh3 size-116 p-l-62 p-r-30" type="text" name="email" placeholder="Email của bạn" ng-model="email" ng-pattern="/^[email protected]$/" ng-required=true>
                                            <span class="valid" ng-show="userInfo.email.$valid">Hợp lệ</span>
                                            <img class="how-pos4 pointer-none" src="{{ asset('themes/cozastore/images/icons/icon-email.png') }}" alt="ICON">
                                        </div>

                                        <!-- Validate lời nhắm -->
                                        <div class="bor8 m-b-30">
                                            <textarea class="stext-111 cl2 plh3 size-120 p-lr-28 p-tb-25" name="message" placeholder="Bạn cần chúng tôi giúp đỡ về vấn đề gì?" ng-model="message" ng-minlength="6" ng-maxlength="250" ng-required=true></textarea>
                                        </div>

                                        <!-- Nút submit form -->
                                        <button type="submit" class="flex-c-m stext-101 cl0 size-121 bg3 bor1 hov-btn3 p-lr-15 trans-04 pointer" ng-disabled="contactForm.$invalid">
                                            Gởi lời nhắn
                                        </button>
                </form>
            </div>

            <div class="size-210 bor10 flex-w flex-col-m p-lr-93 p-tb-30 p-lr-15-lg w-full-md">
                <div class="flex-w w-full p-b-42">
                    <span class="fs-18 cl5 txt-center size-211">
                        <span class="lnr lnr-map-marker"></span>
                    </span>

                    <div class="size-212 p-t-2">
                        <span class="mtext-110 cl2">
                            Địa chỉ
                        </span>

                        <p class="stext-115 cl6 size-213 p-t-18">
                            130 Xô Viết Nghệ Tỉnh, Phường An Hội, Quận Ninh Kiều, TP Cần Thơ
                        </p>
                    </div>
                </div>

                <div class="flex-w w-full p-b-42">
                    <span class="fs-18 cl5 txt-center size-211">
                        <span class="lnr lnr-phone-handset"></span>
                    </span>

                    <div class="size-212 p-t-2">
                        <span class="mtext-110 cl2">
                            Đường dây nóng
                        </span>

                        <p class="stext-115 cl1 size-213 p-t-18">
                            0915-659-223
                        </p>
                    </div>
                </div>

                <div class="flex-w w-full">
                    <span class="fs-18 cl5 txt-center size-211">
                        <span class="lnr lnr-envelope"></span>
                    </span>

                    <div class="size-212 p-t-2">
                        <span class="mtext-110 cl2">
                            Email hỗ trợ
                        </span>

                        <p class="stext-115 cl1 size-213 p-t-18">
                            [email protected]
                        </p>
                    </div>
                </div>
            </div>
        </div>

        <!-- Bản đồ Địa chỉ công ty -->
        <div class="row mt-4">
            <div class="col-md-12 text-center mb-4">
                <h2>Địa chỉ liên hệ</h2>
            </div>
            <div class="col-md-12">
                <iframe src="https://www.google.com/maps/embed?pb=!1m18!1m12!1m3!1d3928.723612696626!2d105.78061631534743!3d10.03965089282403!2m3!1f0!2f0!3f0!3m2!1i1024!2i768!4f13.1!3m3!1m2!1s0x31a062a768a8090b%3A0x4756d383949cafbb!2zMTMwIFjDtCBWaeG6v3QgTmdo4buHIFTEqW5oLCBBbiBI4buZaSwgTmluaCBLaeG7gXUsIEPhuqduIFRoxqEsIFZp4buHdCBOYW0!5e0!3m2!1svi!2s!4v1544352305719" width="100%" height="450" frameborder="0" style="border:0" allowfullscreen></iframe>
            </div>
        </div>
    </div>
</section>

@endsection

{{-- Thay thế nội dung vào Placeholder `custom-scripts` của view `frontend.layouts.master` --}}
@section('custom-scripts')
<script>
    // Khai báo controller `contactController`
    app.controller('contactController', function($scope, $http) {
        // hàm submit form sau khi đã kiểm tra các ràng buộc (validate)
        $scope.submitContactForm = function() {
            // kiểm tra các ràng buộc là hợp lệ, gởi AJAX đến action
            if ($scope.contactForm.$valid) {

            }
        };
    });
</script>
@endsection
Step 3: cấu hình biến môi trường để gởi mail
Sử dụng email test:
Trong khóa học, các bạn có thể sử dụng email test của mình để test việc gởi mail thông qua hệ thống GMAIL. Thông tin email test như sau:- Email:
[email protected] - Password:
tvcvmcbzkfjjekoi
Sử dụng email cá nhân:
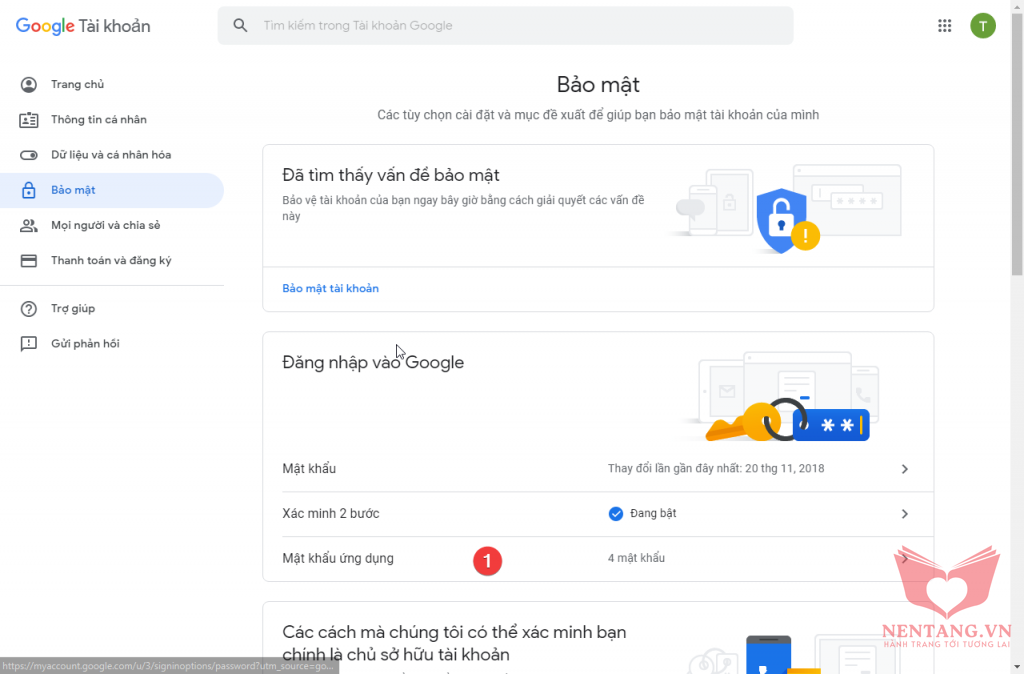
Cách 1: sử dụng Mật khẩu ứng dụng
- Truy cập email cá nhân của bạn, chọn:
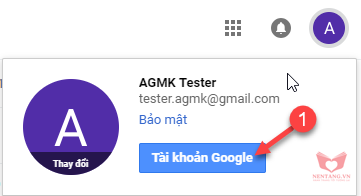
- Chọn
Bảo mật-> BậtXác minh 2 bước
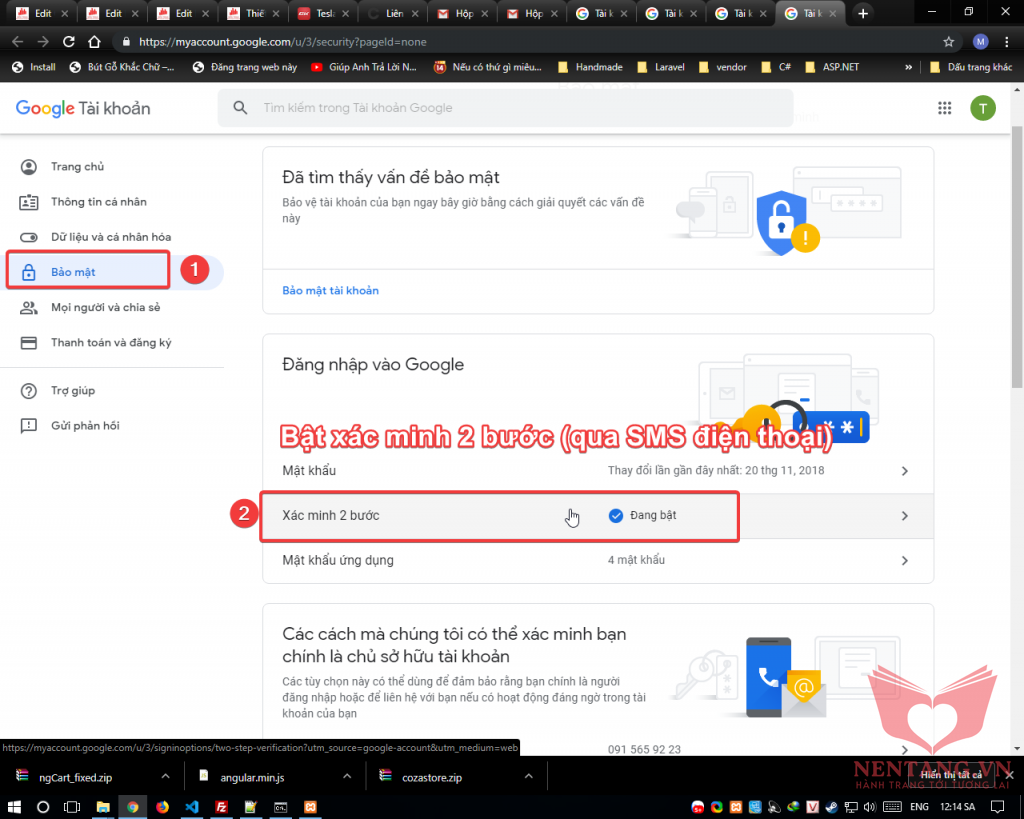
- Tạo
Mật khẩu ứng dụng:
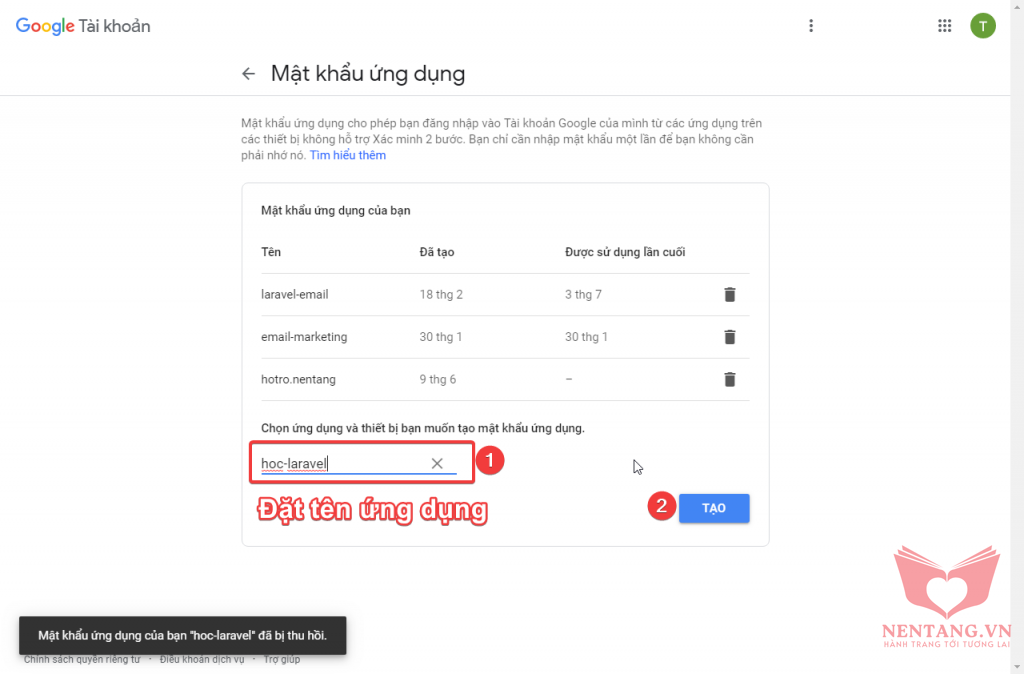
- Đặt tên ứng dụng -> bấm Tạo
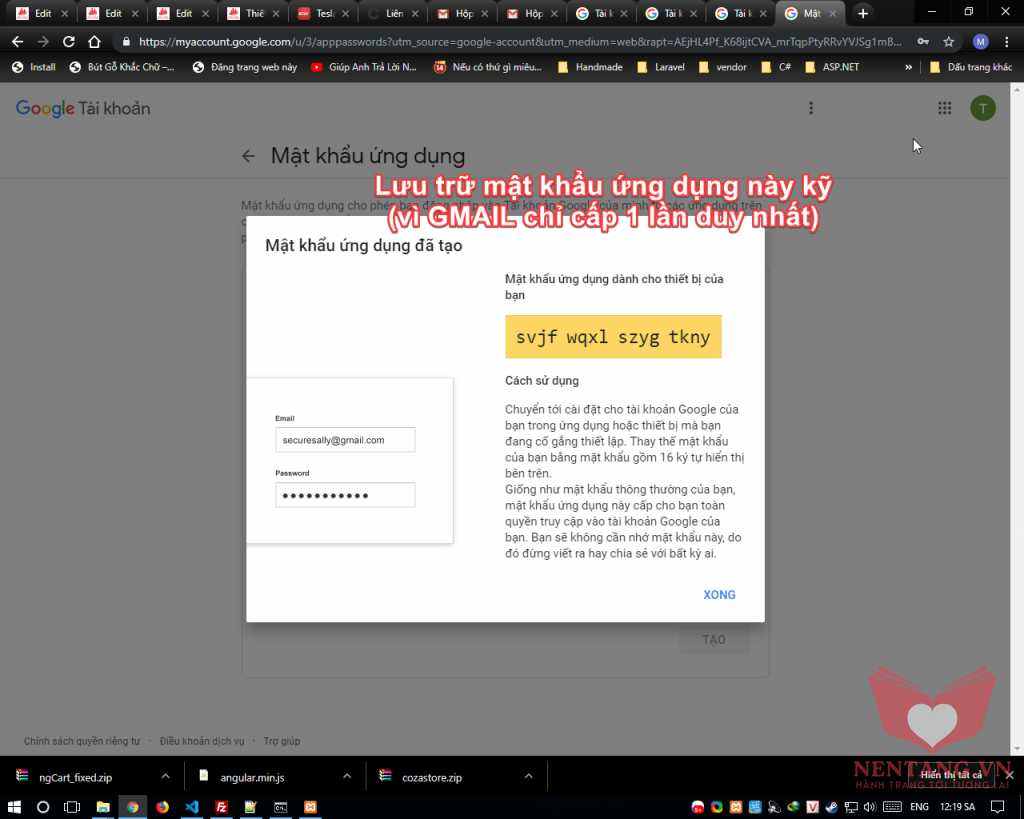
- Cần lưu trữ mật khẩu kỹ càng, vì GMAIL chỉ cấp 1 lần duy nhất.
Hiệu chỉnh file .env
MAIL_DRIVER=smtp
MAIL_HOST=smtp.gmail.com
MAIL_PORT=587
[email protected]
MAIL_PASSWORD=tvcvmcbzkfjjekoi
MAIL_ENCRYPTION=tls
[email protected]
MAIL_FROM_NAME="Shop hoa tươi Sunshine"
Cách 2: bật chế độ Kém an toàn (Không khuyến khích sử dụng)
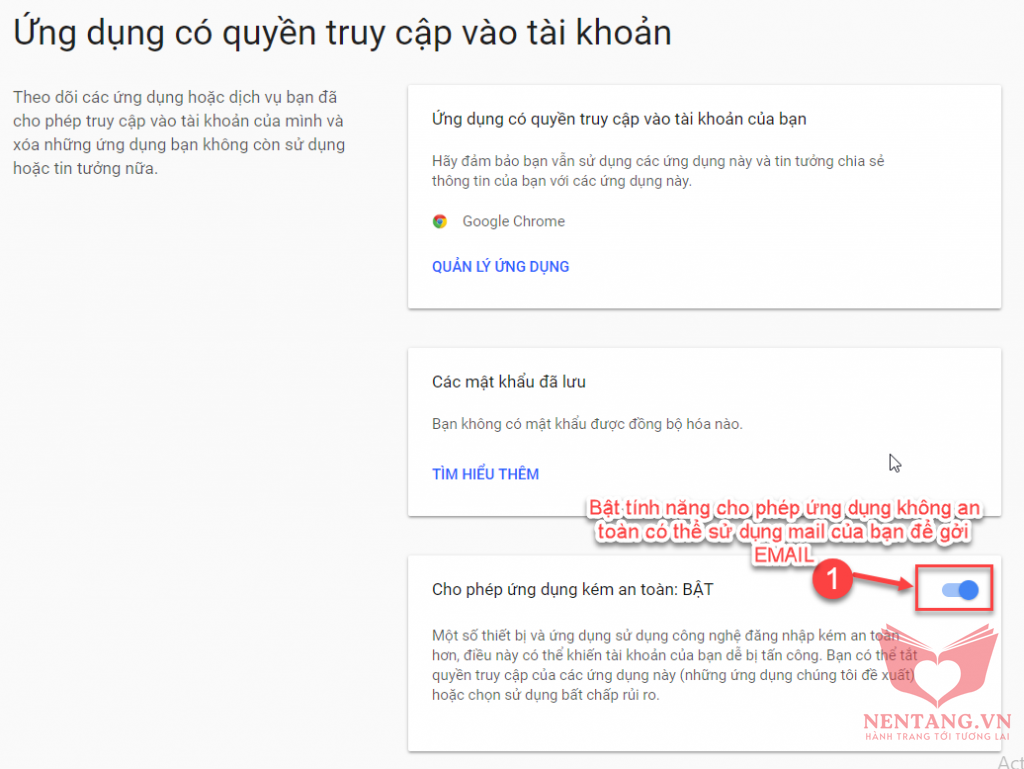
Nếu sử dụng email cá nhân, các bạn cần phải bật cấu hình cho phép "Ứng dụng có thể gởi mail bằng phương pháp không bảo mật", setting như sau:
- Truy cập email cá nhân của bạn, chọn:

- Chọn cấu hình "Ứng dụng có quyền truy cập vào tài khoản"

- Bật cấu hình "Cho phép ứng dụng kém an toàn: BẬT"
Hiệu chỉnh file .env
MAIL_DRIVER=smtp
MAIL_HOST=smtp.gmail.com
MAIL_PORT=587
[email protected]
MAIL_PASSWORD=<mật khẩu đăng nhập EMAIL>
MAIL_ENCRYPTION=tls
[email protected]
MAIL_FROM_NAME="Shop hoa tươi Sunshine"
- Các bạn có thể thay đổi thành email cá nhân. Lưu ý: cần cấu hình email "kém an toàn" như trên.
Chạy câu lệnh để clear cache của Laravel
php artisan config:cache
php artisan view:clear
composer dumpautoload
Step 4: tạo class Quản lý việc gởi MAIL ContactMailer
- Thực thi câu lệnh
php artisan make:mail ContactMailer
- Laravel Framework sẽ tạo cho bạn file controller ở
app/Mail/ContactMailer.php - Nội dung file
ContactMailer.php
<?php

namespace App\Mail;

use Illuminate\Bus\Queueable;
use Illuminate\Mail\Mailable;
use Illuminate\Queue\SerializesModels;
use Illuminate\Contracts\Queue\ShouldQueue;

class ContactMailer extends Mailable
{
    use Queueable, SerializesModels;
    /**
     * Tạo biến chứa dữ liệu dùng để render email template
     */
    public $data;
    /**
     * Create a new message instance.
     *
     * @return void
     */
    public function __construct($data)
    {
        $this->data = $data;
    }
    /**
     * Build the message.
     *
     * @return $this
     */
    public function build()
    {
        $email = $this->data['email'];
        return $this->from(env('MAIL_FROM_ADDRESS', '[email protected]'), env('MAIL_FROM_NAME', 'Sunshine'))
            ->replyTo($email)
            ->subject("Có khách $email vừa liên hệ")
            ->view('emails.contact-email')
            ->with('data', $this->data);
    }
}
Step 5: tạo route sendMailContactForm
- Hiệu chỉnh file
routes/web.php
Route::post('/lien-he/goi-loi-nhan', 'Frontend\FrontendController@sendMailContactForm')->name('frontend.contact.sendMailContactForm');
Step 6: viết code action
Viết code cho action contact():
- Action
contact()dùng để hiển thị giao diện trang Liên hệcontact.
Hiệu chỉnh file app/Http/Controllers/Frontend/FrontendController.php
use Mail;
use App\Mail\ContactMailer;


/**
 * Action gởi email với các lời nhắn nhận được từ khách hàng
 * POST /lien-he/goi-loi-nhan
 */
public function sendMailContactForm(Request $request)
{
    $input = $request->all();
    Mail::to('[email protected]')->send(new ContactMailer($input));
    return $input;
}
Step 7: Tạo view trình diễn mẫu email Liên hệ
- Tạo thư mục
resources/views/emailsđể quản lý email template - Tạo file
resources/views/emails/contact-email.blade.php
<table style="width: 100%; border-spacing: 0px">
    <tr>
        <td style="border-top: 1px solid black;border-bottom: 1px solid black;border-right: 1px solid black;border-left: 1px solid black; width: 153px; padding: 5px;"> <img src="https://nentang.vn/storage/uploads/2018/08/logo-nentang.jpg" style="width: 153px; height: 153px;" /> </td>
        <td style="border-top: 1px solid black;border-bottom: 1px solid black;border-right: 1px solid black; text-align: center; vertical-align: middle; padding: 5px;">
            <h1 style="color: red;">Shop hoa tươi Sunshine</h1>
        </td>
    </tr>
    <tr>
        <td colspan="2" style="border-bottom: 1px solid black;border-right: 1px solid black;border-left: 1px solid black; padding: 5px;"> Đây là lời nhắn được gởi từ khách hàng có thông tin như sau: </td>
    </tr>
    <tr>
        <th style="border-bottom: 1px solid black;border-right: 1px solid black;border-left: 1px solid black;text-align: right; padding: 5px;">Email khách hàng:</th>
        <td style="border-bottom: 1px solid black;border-right: 1px solid black; padding: 5px;">{{ $data['email'] }}</td>
    </tr>
    <tr>
        <th style="border-bottom: 1px solid black;border-right: 1px solid black;border-left: 1px solid black;text-align: right; padding: 5px;">Lời nhắn khách hàng:</th>
        <td style="border-bottom: 1px solid black;border-right: 1px solid black; padding: 5px;">{!! $data['message'] !!}</td>
    </tr>
</table>
Step 8: sử dụng AngularJS để gởi request POST khi submit contact form
Hiệu chỉnh file contact.blade.php:
{{-- Thay thế nội dung vào Placeholder `custom-scripts` của view `frontend.layouts.master` --}}
@section('custom-scripts')
<script>
    // Khai báo controller `contactController`
    app.controller('contactController', function($scope, $http) {
        // hàm submit form sau khi đã kiểm tra các ràng buộc (validate)
        $scope.submitContactForm = function() {
            // kiểm tra các ràng buộc là hợp lệ, gởi AJAX đến action
            if ($scope.contactForm.$valid) {
                // lấy data của Form
                var dataInputContactForm = {
                    "email": $scope.contactForm.email.$viewValue,
                    "message": $scope.contactForm.message.$viewValue,
                    "_token": "{{ csrf_token() }}",
                };

                // sử dụng service $http của AngularJS để gởi request POST đến route `frontend.contact.sendMailContactForm`
                $http({
                    url: "{{ route('frontend.contact.sendMailContactForm') }}",
                    method: "POST",
                    data: JSON.stringify(dataInputContactForm)
                }).then(function successCallback(response) {
                    // Gởi mail thành công, thông báo cho khách hàng biết
                    swal('Gởi mail thành công!', 'Chúng tôi sẽ trả lời Quý khách trong thời gian sớm nhất. Xin cám ơn!', 'success');

                }, function errorCallback(response) {
                    // Gởi mail không thành công, thông báo lỗi cho khách hàng biết
                    swal('Có lỗi trong quá trình gởi mail!', 'Vui lòng thử lại sau vài phút.', 'error');
                    console.log(response);
                });
            }
        };
    });
</script>
@endsection
Step 9: gắn liên kết cho menu contact trên header
Hiệu chỉnh file resources/views/frontend/layouts/partials/header.blade.php:
<!-- Các đoạn code còn lại
     ...
-->

<!-- Menu desktop -->
<div class="menu-desktop">
  <ul class="main-menu">
    <li class="{{ Request::is('') ? 'active-menu' : '' }}">
      <a href="{{ route('frontend.home') }}">Home</a>
    </li>

    <li>
      <a href="product.html">Shop</a>
    </li>

    <li class="label1" data-label1="hot">
      <a href="shoping-cart.html">Features</a>
    </li>

    <li>
      <a href="blog.html">Blog</a>
    </li>

    <li class="{{ Request::is('gioi-thieu') ? 'active-menu' : '' }}">
      <a href="{{ route('frontend.about') }}">About</a>
    </li>

    <li class="{{ Request::is('lien-he') ? 'active-menu' : '' }}">
	<a href="{{ route('frontend.contact') }}">Contact</a>
    </li>
  </ul>
</div>

<!-- Các đoạn code còn lại
     ...
-->
Kiểm tra
- Truy cập trang http://sunshine.local/lien-he
- Nhập email, lời nhắn và bấm submit
- Truy cập email
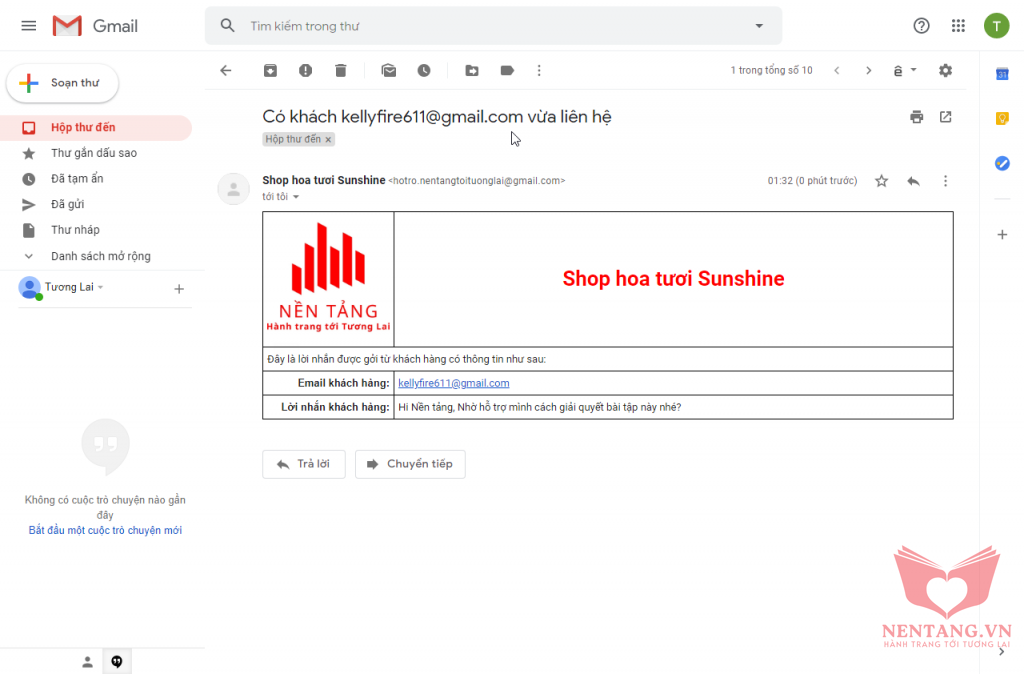
[email protected]hoặc email cá nhận của bạn kiểm tra xem có nhận được mail từ khách hàng không? Nếu okey thì sẽ nhận được mail như sau:
Bonus nếu có lỗi gởi MAIL
'stream' => [
        'ssl' => [
            'verify_peer' => false,
            'verify_peer_name' => false,
            'allow_self_signed' => true,
        ],
    ],
Bình luận
Bình luận của bạnNền tảng các kiến thức học tập
Cùng nhau học tập, khám phá các kiến thức nền tảng về Lập trình web, mobile, database nhé.
Nền tảng kiến thức - Hành trang tới tương lai hân hạnh phục vụ Quý khách!
Khám phá, trải nghiệm ngay

Vui lòng đăng nhập để gởi bình luận!
Đăng nhậpChưa có bình luận nào!